Demolition is not just tearing down a structure. Many people view it as the simple act of swinging a wrecking ball or bringing in an excavator to smash old brick and mortar, but that is a dangerous oversimplification. Demolition is actually a precise, reverse-engineering process that requires just as much planning as the construction itself. Without proper foresight, you aren’t just taking down a building; you are potentially unleashing a cloud of hazardous dust, risking structural collapse on neighbouring properties, or facing massive fines from the Ministry of Labour.
Hidden hazards and regulatory requirements create significant risk if inspections are skipped. Whether you are a homeowner looking to rebuild in the suburbs or a developer managing a commercial teardown in downtown Toronto, the “act first, ask questions later” approach is a recipe for disaster. This is where pre-demolition inspections come in. They serve as the absolute foundation of safe, compliant, and cost-controlled demolition in Ontario. Think of them as the blueprint for destruction. You wouldn’t build a house without a plan, so why would you try to destroy one without knowing exactly what is inside the walls?
Key Takeaways
- Safety First: Inspections identify critical hazards like asbestos, lead, and structural weaknesses before work begins.
- Legal Compliance: In Ontario, proceeding without a Designated Substances Survey (DSS) violates the Occupational Health and Safety Act (OHSA).
- Cost Control: Catching hazardous materials early prevents expensive “surprise” change orders mid-project.
- Timeline Security: Proper documentation helps avoid stop-work orders and delays in obtaining municipal permits.
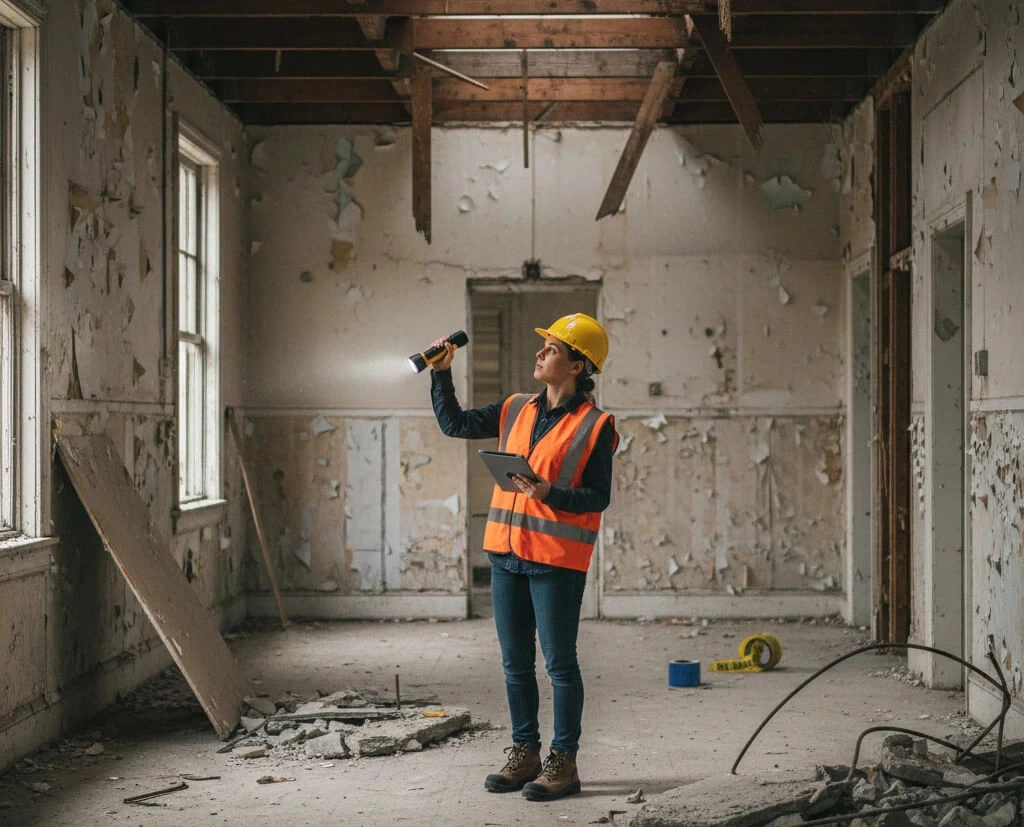
What Is a Pre-Demolition Inspection?
At its core, a pre-demolition inspection is a comprehensive assessment of a building’s condition and contents prior to any destruction. It is an investigative process designed to catalogue the physical state of the structure and, more importantly, identify any materials that could pose a health risk during the teardown.
It is vital to clarify what this inspection is not. It is not a casual walkthrough where a contractor kicks the tires and says, “Yeah, looks good to go.” It is a rigorous, data-driven survey often involving destructive sampling, where inspectors actually cut into walls or flooring to see what lies underneath layers of renovation history.
Pre-Demolition Inspection vs Hazardous Materials Survey
You might hear these terms used interchangeably, but there is a nuance here. A hazardous materials survey before demolition is a specific component of the broader pre-demolition inspection. The “inspection” covers structural integrity, utility disconnections, and site logistics, while the “survey” focuses specifically on chemical and biological hazards such as asbestos, lead, and mercury. However, in practice, especially in the GTA, when we talk about a pre-demolition inspection, the designated substances survey Ontario requires is almost always the headline event.
Pre-Renovation vs Pre-Demolition Inspections
Are they the same? Not quite. A pre-renovation inspection is usually less invasive because you intend to keep the building standing. You might only sample materials in the specific room being remodelled. A pre-demolition survey, on the other hand, is destructive by nature. Since the building is coming down anyway, inspectors can (and should) be aggressive in their search for hazards, checking behind walls, under slabs, and inside cavities that a renovation survey might miss.
Why Pre-Demolition Inspections Are Critical
Skipping this step is like driving on the 401 with a blindfold. You might make it a few kilometres, but the crash is inevitable.
Protecting Worker and Public Safety
The primary goal is human safety. If a bulldozer crashes through a wall filled with friable asbestos, millions of microscopic fibres are released into the air. These fibres don’t just stay on site; they drift into the neighbour’s yard, the sidewalk, and the lungs of the crew. A proper inspection identifies these risks so they can be safely removed (abated) before heavy machinery ever touches the site.
Identifying Hidden Hazardous Materials
Older buildings in Toronto are like time capsules of construction history. You might find lead paint testing before demolition reveals layers of toxic paint from the 1950s hidden beneath modern latex paint. Or perhaps there is vermiculite insulation in the attic. Identifying these early ensures they are handled by specialists, not smashed into dust by general labourers.
Preventing Costly Change-Orders
Imagine this scenario: Your contractor quotes you a price for “clean” demolition. Halfway through, they find a hidden underground storage tank or asbestos floor tiles. Work stops immediately. The Ministry is called. The abatement team is scheduled. The price skyrockets. A thorough pre-demolition inspection helps you secure a fixed, accurate quote upfront, keeping your budget realistic.
Avoiding Stop-Work Orders and Delays
Nothing kills project momentum faster than a Ministry of Labour inspector slapping a stop-work order on your fence. If you cannot produce a designated substances survey Ontario mandates when asked, your site will be shut down until you can. In the construction world, time is money, and weeks of delay can destroy your profit margins.
Supporting Sustainable Salvage and Waste Planning
We all want to keep waste out of landfills. Knowing exactly what materials are in the building allows for better waste characterization. Clean concrete can be crushed and reused; metals can be recycled. If these are contaminated with hazardous materials because of a lack of planning, the whole pile often has to go to a hazardous waste landfill at a much higher cost.
Also Read: Safety Standards for Demolitions in Canada
What a Proper Pre-Demolition Inspection Should Include
So, what exactly are you paying for? What is included in a pre-demolition inspection? It is a lot more than just a clipboard and a flashlight.
Building and Site Overview
The inspector starts with the basics. They document the age of the building, the construction type (wood frame, masonry, steel), and any additions that have been tacked on over the years. They also look at neighbouring structures. Is the house next door only two feet away? That changes the demolition strategy significantly.
Structural and Safety Risk Assessment
Before anyone starts swinging hammers, we need to know if the building is already falling down. The inspection identifies collapse zones and unsafe access points. It looks for rotting beams or compromised foundations that could make the abatement process dangerous for workers before the actual demolition even begins.
Utilities and Services Review
You cannot just cut the wires and hope for the best. The inspection verifies the status of hydro, gas, water, and telecom lines. It outlines the requirements for service capping and disconnection letters, ensuring you don’t accidentally flood the site or cause a gas leak.
Hazardous and Environmental Materials Assessment
This is the heavy lifting of the inspection. A comprehensive survey looks for:
- Asbestos: Thermal insulation, floor tiles, drywall compound, and cement pipes.
- Lead paint: On walls, trim, and structural steel.
- PCBs: Often found in old light ballasts and transformers.
- Mercury: In thermostats and fluorescent light tubes.
- Silica: Present in concrete, brick, and stone (dangerous when drilled or crushed).
- Mould and radon: Biological hazards that need containment.
- Refrigerants and fuels: Ozone-depleting substances in AC units and oil in tanks.
Ontario-Specific Compliance Requirements
We aren’t in Texas or London; we are in Ontario, and we have very specific rules.
What Is Typically Required Before Demolition in Ontario
The “Big Boss” of regulations here is the Occupational Health and Safety Act (OHSA). Specifically, Section 30 requires building owners to provide a list of designated substances to prospective contractors before they bid on the work. If you tender a project without an asbestos survey before demolition, Ontario laws recognize that you are liable for any exposure incidents.
Municipal Permits and Documentation
To get a demolition permit in Toronto or the GTA, you generally need to prove you have done your homework. Demolition permit inspection requirements in Ontario municipalities usually include proof that utilities have been disconnected and that you have a plan for hazardous materials. While the city might not always ask for the full DSS report at the permit desk, the Ministry of Labour inspector will definitely ask for it when they visit the site.
Roles and Responsibilities
It is a team effort. The Property Owner is responsible for providing the designated substances list. The Contractor is responsible for protecting their workers based on that list. The Consultants (like MAGCOR’s partners) are responsible for correctly identifying the hazards. If the owner drops the ball, the whole chain collapse.
Also Read: Step-by-Step Residential Demolition Checklist: From Planning to Site Cleanup
Step-by-Step Pre-Demolition Inspection Process
Ready to get started? Here is how the process flows.
Step 1 — Collect Building History and Records
Dig out those old blueprints or renovation receipts. Knowing that the kitchen was redone in 1990 helps the inspector focus their sampling strategy.
Step 2 — Engage Qualified Professionals
This is not a DIY job. You need a qualified person (QP) as defined by Ontario regulations. Hiring a professional ensures the report will stand up to scrutiny. Request a pre-demolition assessment with MAGCOR to ensure you have the right team on your side.
Step 3 — Sampling and Laboratory Testing
The inspector will walk the site, physically taking small pieces of materials (samples) from various locations. These are bagged, labelled, and sent to an accredited laboratory for analysis.
Step 4 — Inspection Report Deliverables
You will receive a detailed report. It should include:
- Floor plans marking where samples were taken.
- Sample locations are clearly identified.
- Material quantities (e.g., “500 square feet of asbestos floor tile”).
- Removal recommendations outlining how to safely get rid of the bad stuff.
Step 5 — Turning Findings into a Safe Demolition Plan
The report isn’t a paperweight; it’s an instruction manual. The demolition contractor uses it to create a Site-Specific Safety Plan and to schedule the abatement crew before the heavy machinery arrives.
Cost, Timeline, and Budget Considerations
Let’s talk dollars and cents.
What Affects Inspection Costs
The size of the building is the biggest factor. A 1,500 sq. ft. bungalow costs less to inspect than a 50,000 sq. ft. industrial warehouse. The number of samples also drives the price; lab tests aren’t free. However, skimping on samples to save a few hundred dollars is false economy if you miss a hazard that costs thousands to clean up later.
Typical Timelines from Inspection to Demolition
Usually, the site visit takes a day or two. Lab results can take 3 to 5 business days. Once the report is in hand, abatement might take a week, followed by the actual demolition. GTA demolition planning requirements mean you should start this process at least 4-6 weeks before you want the building gone.
How Inspections Save Money Long-Term
Think of the inspection fee as an insurance premium. Identifying that lead paint now means you can budget for it. Finding it later means work stoppages, rush fees for abatement, and potential fines. The ROI on a good inspection is massive.
Pre-Demolition Inspection Checklist (Owner-Focused)
To help you stay organized, here is a simple demolition inspection checklist for property owners.
Before the Inspection
- Clear access to all rooms, including attics and crawlspaces.
- Locate any existing blueprints or renovation records.
- Unlock all gates and doors.
- Verify if power needs to be on (for lighting) or off (for safety).
During the Inspection
- Point out known issues (leaks, previous repairs).
- Ask the inspector where they are sampling (expect some holes in the walls).
- Ensure all outbuildings (garages, sheds) are checked.
Before Demolition Begins
- Receive the final DSS report.
- Confirm all utilities are disconnected (get the disconnect letters!).
- Share the report with your demolition contractor.
- Get a demolition quote based on the confirmed scope of work.
Common Pre-Demolition Inspection Mistakes
Even smart people make mistakes. Here are the pitfalls to avoid.
Assuming No Asbestos or Hazards
“My house was built in 1985; it’s fine.” Not necessarily. Asbestos was used in some products well into the late 80s. Never assume.
Incomplete Scope or Missed Areas
Did the inspector check the roof layers? Did they look under the ceramic tile for an older layer of linoleum? Missed areas are the most common cause of change orders.
Proceeding Without Lab Results
Starting demolition because “it looks like drywall” is a gamble you will likely lose. Visual identification of asbestos is impossible. You need the lab data.
Also Read: Excavation Techniques: Choosing the Right Method for Your Project
Why Choose MAGCOR for Demolition Planning
You have a lot of choices in the GTA, so why partner with us?
Integrated Demolition and Abatement Expertise
We don’t just knock things down; we understand the science of hazardous materials. Because we handle both the abatement coordination and the demolition, nothing gets lost in translation. We read the reports, we understand the risks, and we execute the plan seamlessly.
One Coordinated Schedule, Fewer Delays
When you hire separate companies for inspection, abatement, and demolition, you become the middleman juggling schedules. With MAGCOR, you get a unified timeline. We know that the abatement team needs to finish on Tuesday so the excavators can roll in on Wednesday.
Experience Across Residential and Commercial Projects
From tight residential lots in downtown Toronto to sprawling commercial complexes in the suburbs, we have seen it all. We understand the specific municipal quirks and GTA demolition planning requirements that can trip up less experienced contractors.
Smart Planning for a Clean Slate
Demolition is the end of a building’s life, but it is the beginning of your project’s future. By prioritizing a thorough pre-demolition inspection, you are not just ticking a regulatory box; you are protecting your wallet, your timeline, and the health of everyone involved.
To recap, a proper inspection:
- Identifies hazards like asbestos and lead before they become airborne.
- Ensures compliance with Ontario’s strict OHSA and municipal regulations.
- Prevents financial shock by clarifying the scope of work upfront.
Don’t let hidden hazards turn your demolition project into a nightmare. Start with clarity. Start with safety.
Speak to a demolition & abatement specialist today to get your project started on the right foundation.